


最近要做一个以SAP为数据中心的项目,涉及到大量的外部系统交互。所以在这里记录一下SAP Web Services 相关的技术点。方便后续回顾和使用。
SAP Web Services 发布
一、Web Service介绍
Web Service就是一个应用程序,它向外界暴露出一个能够通过Web调用的API。Web Service是一种基于Web的中间件技术。用户通过把应用程序的一部分包装成Web服务的形式,将自己的应用程序功能提供给别人,实现应用程序之间的接口。webservice可用于多个系统和SAP系统之间的传输,比较灵活。
根据外部系统提供的webservice的wsdl地址,在SAP系统创建webservice consumer时候输入该URL。使用SOAMANAGER创建逻辑端口,封装函数,在函数里指定端口,并调用类的方法,反之,创建webservice provider,生成wsdl供外部调用。
以上内容摘自ABAP接口创建。
二、创建外部调用的RFC
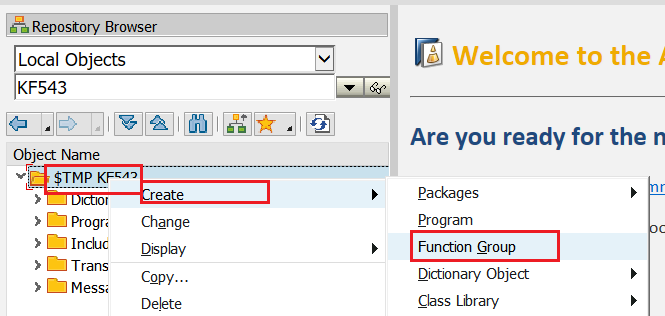
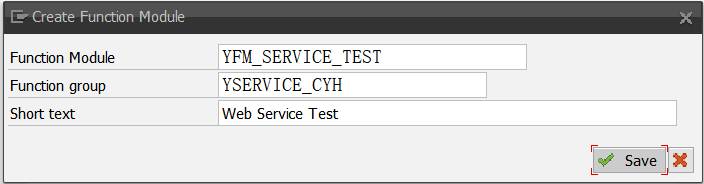
1.创建Function Group
如果你有可以使用的Function Group则可以跳过。
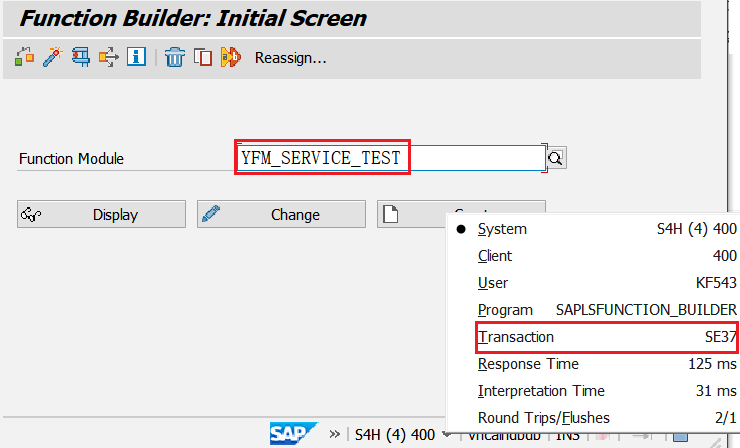
(1)使用TCODE SE80
(2)填写Function Group的属性
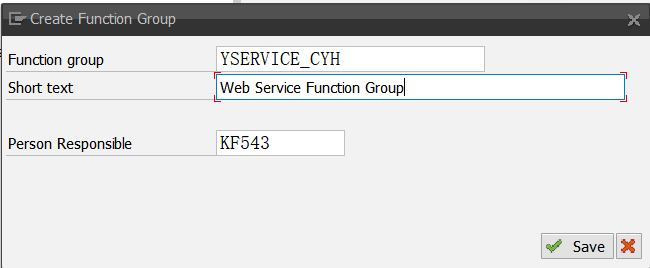
填写完上面的属性设置后,点击下方的按钮就创建好了一个Function Group。但是此时需要打开该Function Group的Include文件夹进行激活。因为创建好的Function Group的TOP Include是未激活状态。
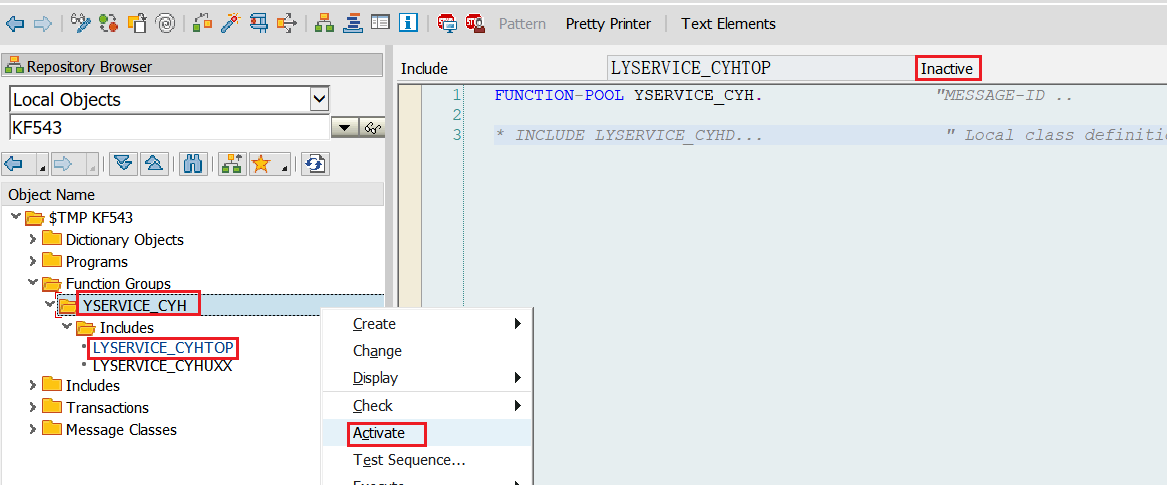
激活之后就可以继续下面的操作了。
2.使用TCODE SE37 创建RFC
3.设置参数并编写Source Code
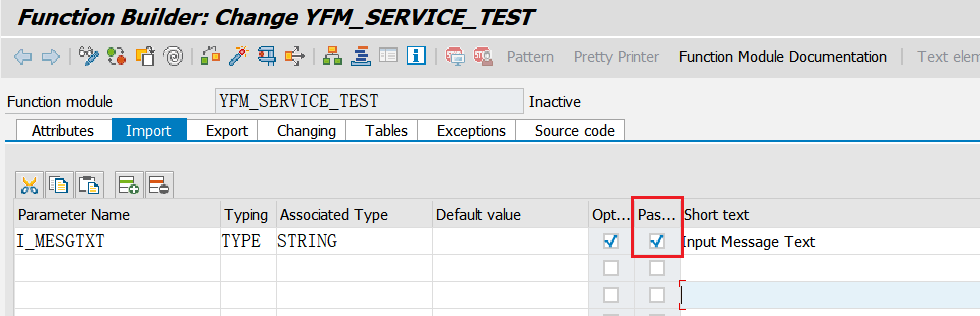
(1)输入参数
切记要勾选Pass By Value按钮,远程调用的RFC均需要勾选这个属性。
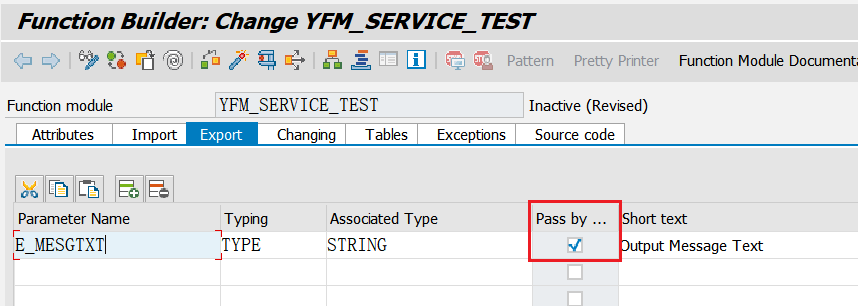
(2)输出参数
需要勾选Pass By Value按钮。
(3)Source Code
1 | FUNCTION YFM_SERVICE_TEST. |
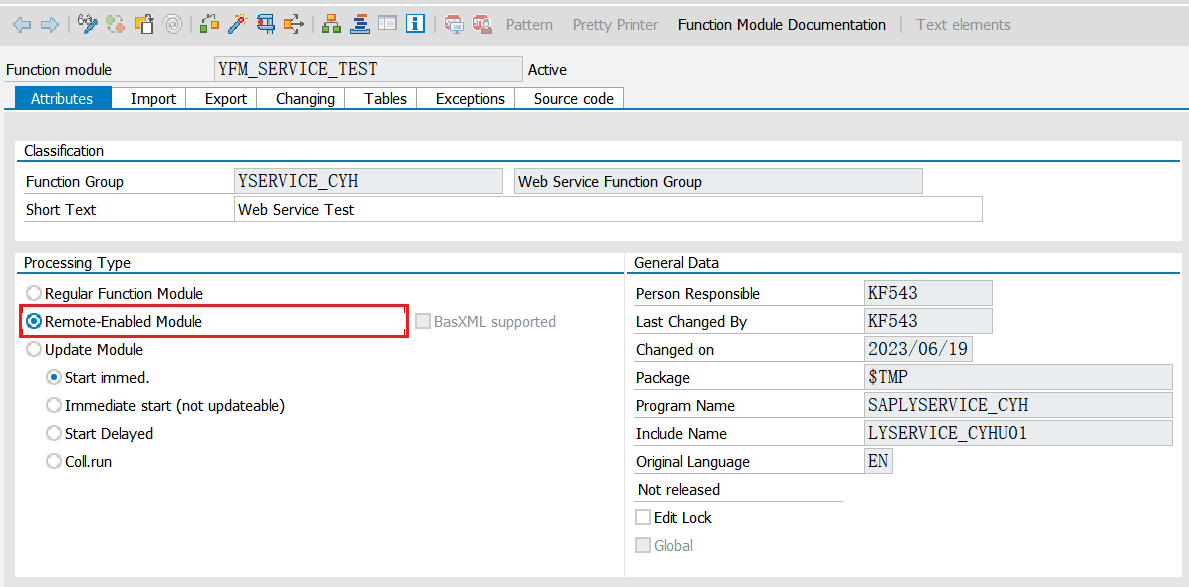
4.设置远程RFC属性
三、创建Web Service
1.使用创建好的RFC创建
此处简略介绍一下这种方式,这种方式很快也很便捷。但是这次为了能 详细记录,所以主要介绍下面的通过Package的方式创建Web Service。
使用RFC直接创建。Web Service的路径如下:Utilities->More Utilities->Create Web Service->From the Function Module。
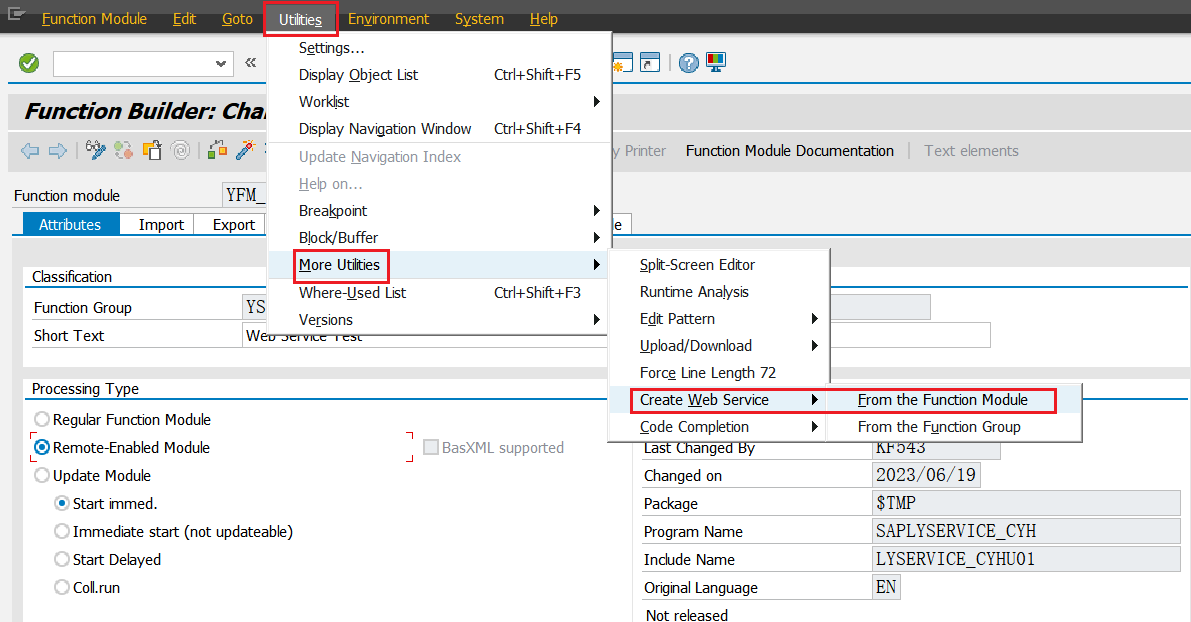
通过这种方式可以直接跳转到下面通过Package创建的第四项填写服务名称与描述。
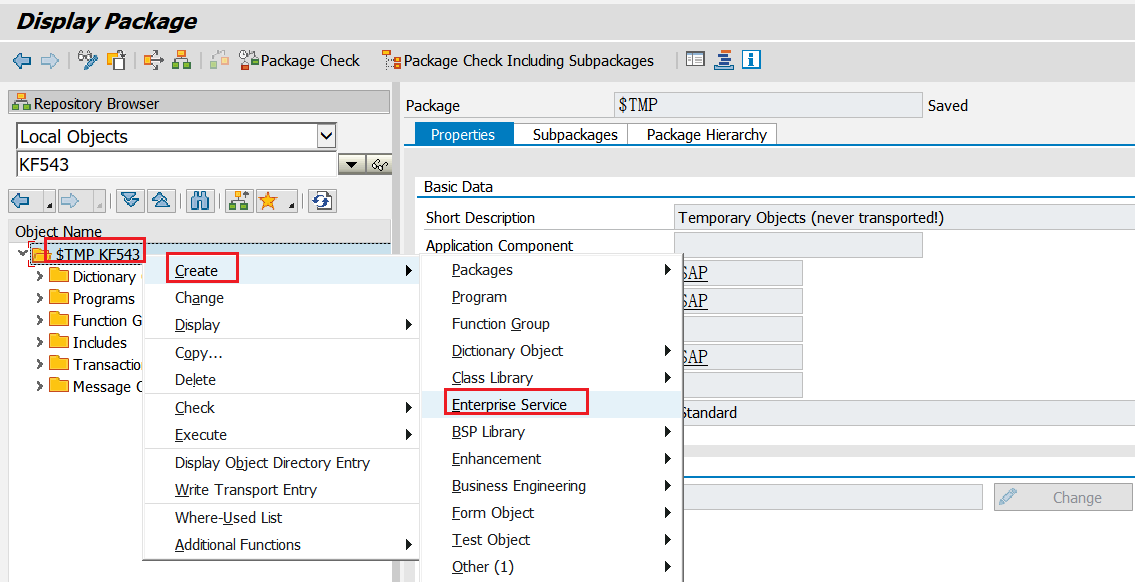
2.通过Package创建
(1)通过TCODE SE80 打开Package
(2)选择Service Type
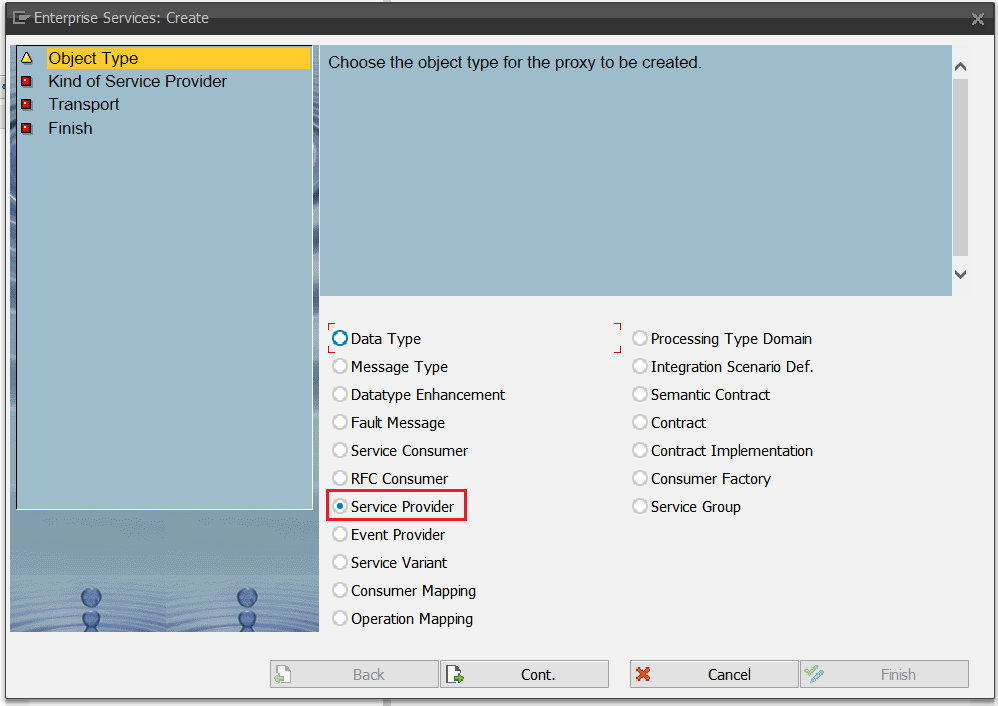
上面选择项的翻译如下:
- Data Type:数据类型
- Message Type:Message 类型
- Datatype Enhancement:数据类型增强
- Fault Message:故障信息
- Service Consumer:服务使用者
- RFC Consumer:RFC使用者
- Service Provider:服务提供者
- Event Provider:事件提供者
- Service Variant:服务变式
- Consumer Mapping:使用者映射
- Operation Mapping:业务映射
- Processing Type Domain:处理类型域
- **Integration Scenario Def.**:集成场景描述
- Semantic Contract:
- Contract:合同
- Contract Implementation:合同执行
- Consumer Factory:使用者工厂
- Service Group:服务组
(3)服务提供类型
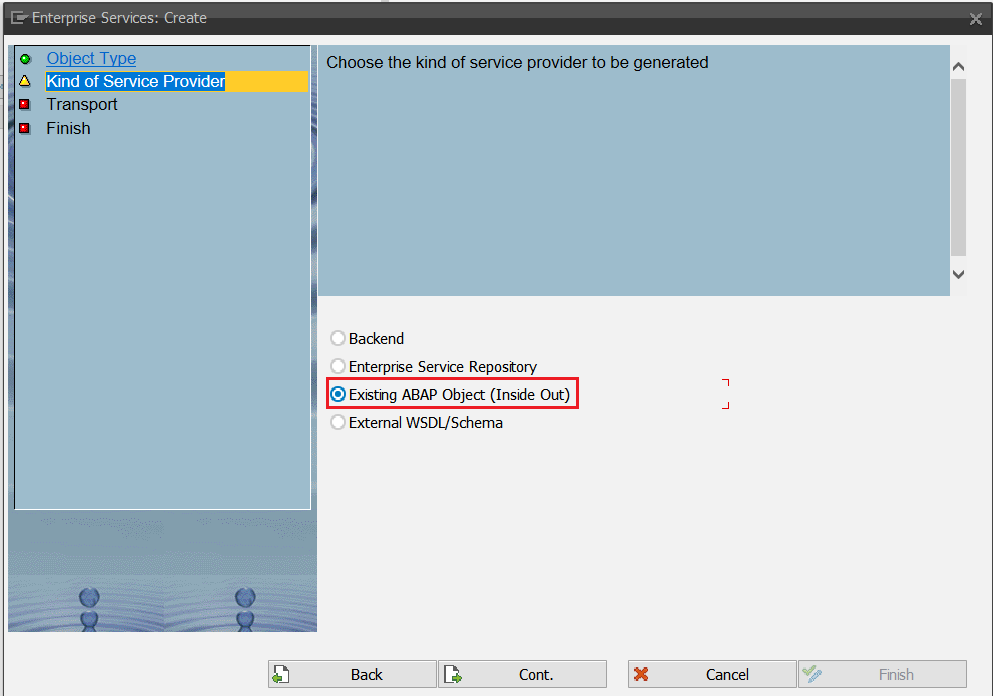
选项意思如下:
- Backend:后端
- Enterprise Service Repository:企业服务存储库
- **Existing ABAP Object(Inside Out)**:现有ABAP对象(由内而外)
- External WSDL/Schema:外部WSDL/架构
(4)填写服务名称与描述
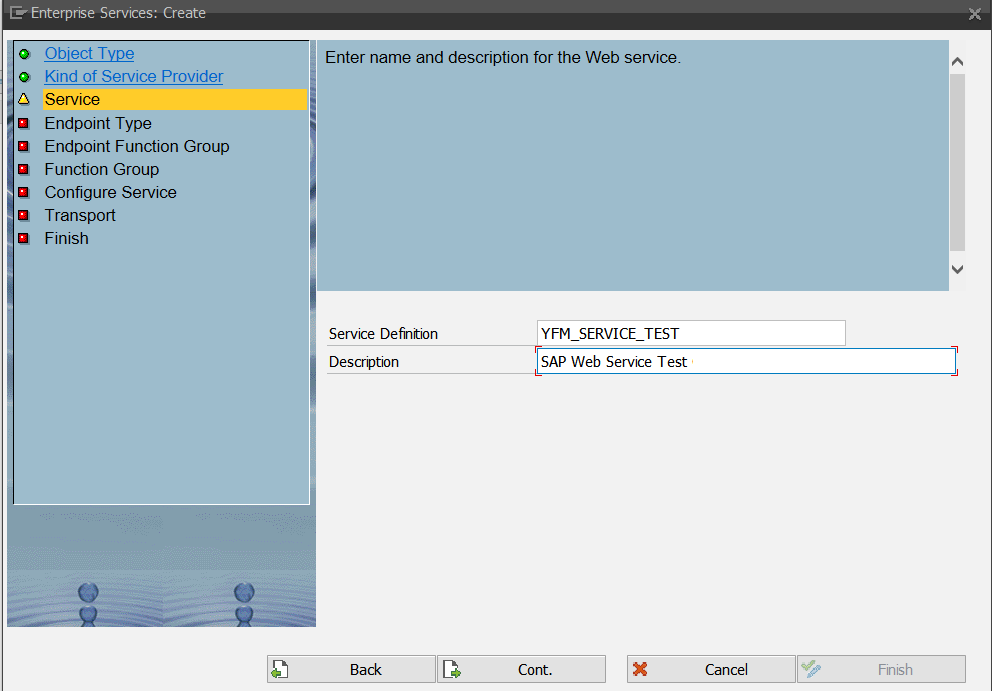
本次填写的服务名称与Function名称一致。
(5)选择端点类型
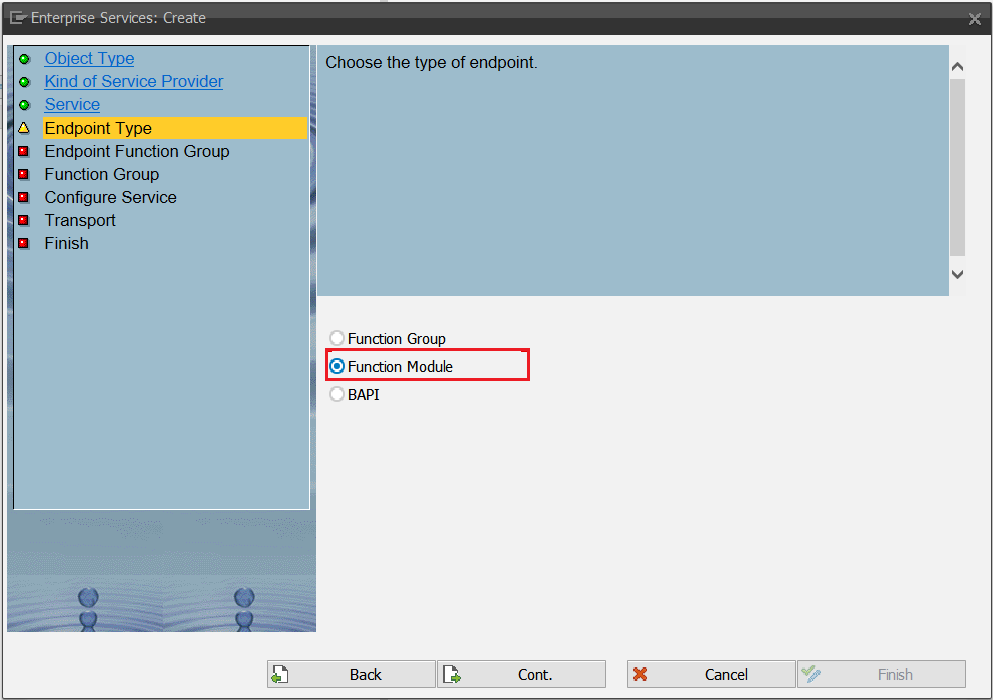
因为这一次是对远程RFC的Web Service,所以选择第二项Function Module。
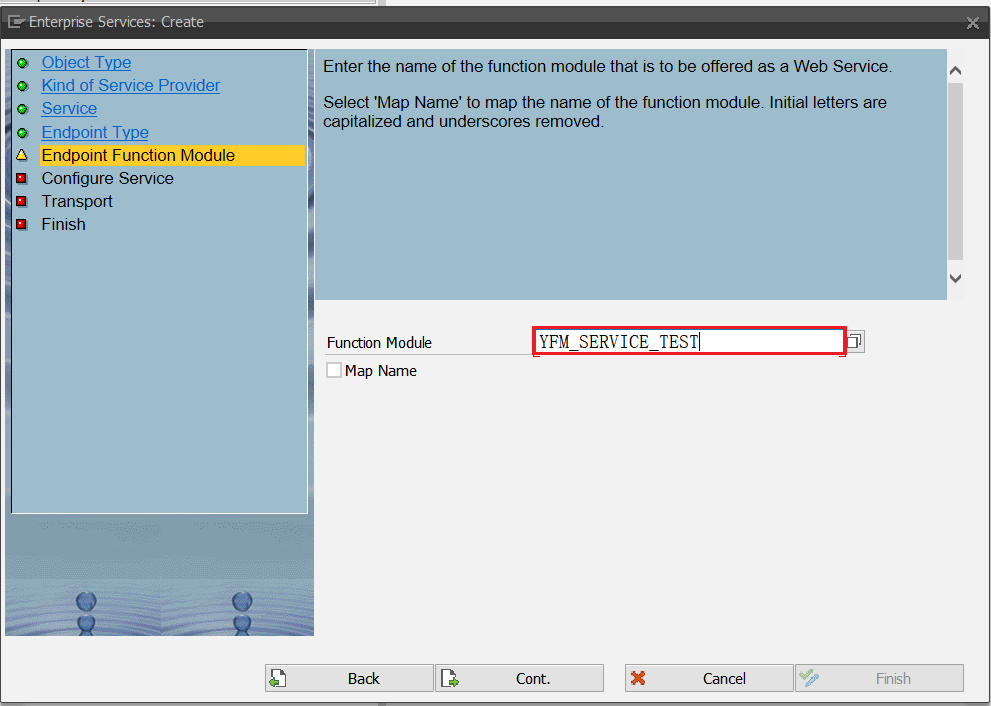
(6)填写Function Module名称
(7)配置服务
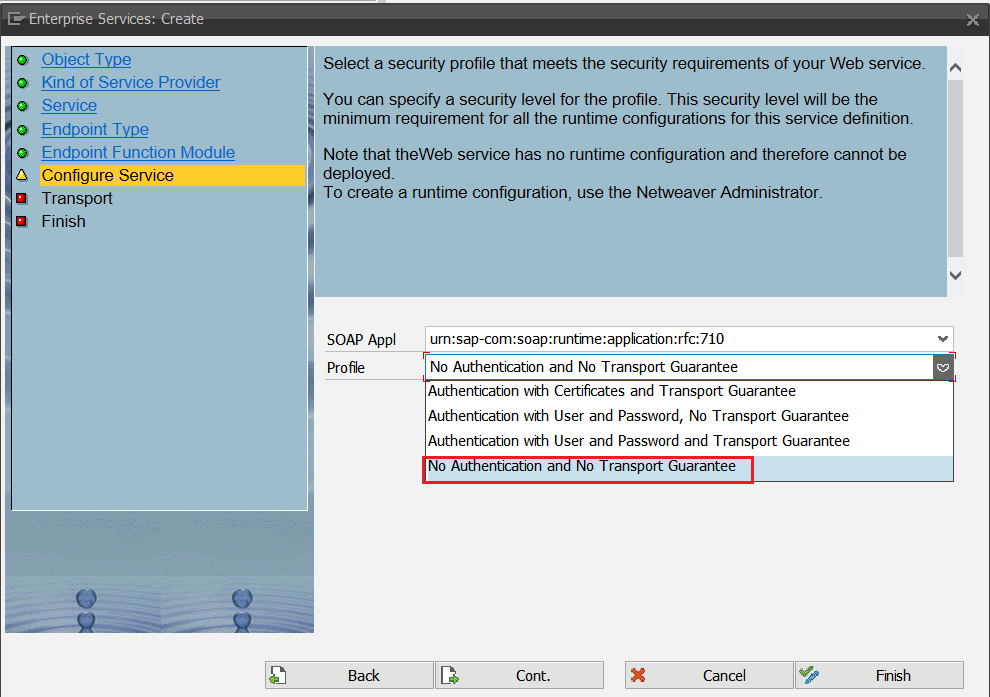
功能描述:
- No Authentication and No Transport Guarantee:无身份验证,无传输保证
- Authentication with Certificates and Transport Guarantee:证书认证和运输保证
- Authentication with User and Password,No Transport Guarantee:使用用户和密码进行身份验证,无传输保证
- Authentication with User and Password and Transport Guarantee:用户和密码身份验证及传输保证
此处选择不同的功能在发布时需要填写不同的校验方式,因为是本地的练习内容,所以选择图示内容即可。
(8)选择Package
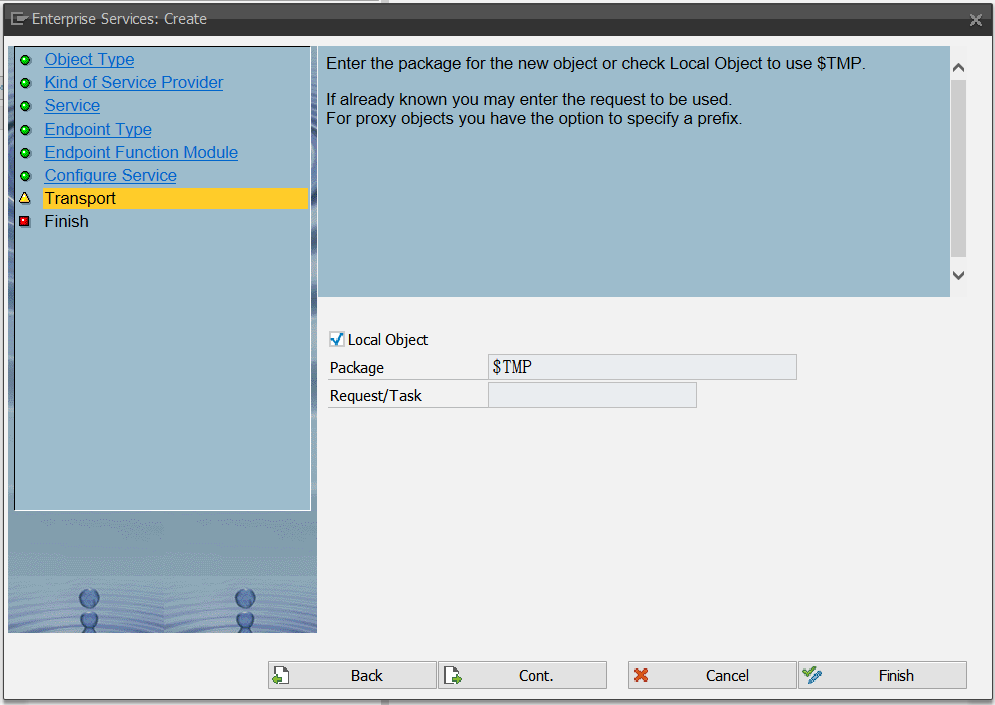
此处选择存放Web Service的Package,如果选择的不是本地对象则还需要填写请求号。
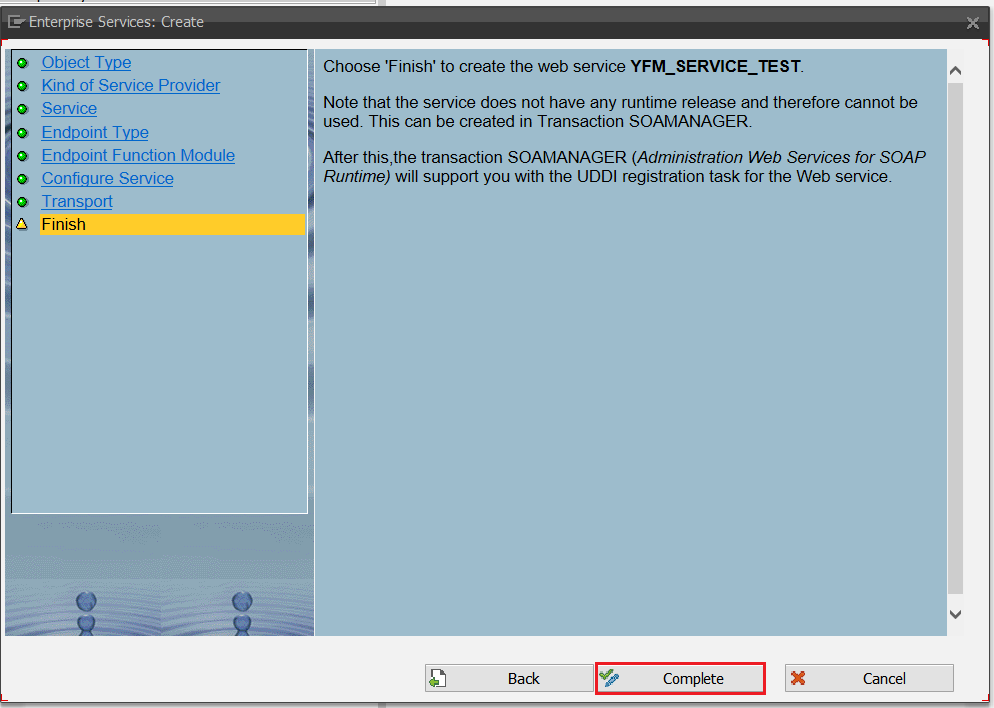
(9)完成创建
(10)激活Web Service

进行完上面的操作之后,Function Module的Web Service就创建完成了。之后就是Web Service的发布。
四、发布Web Service
1.事务码 SOAMANAGER
发布Web Service的事务码是SOAMANAGER。进入后的界面如下:
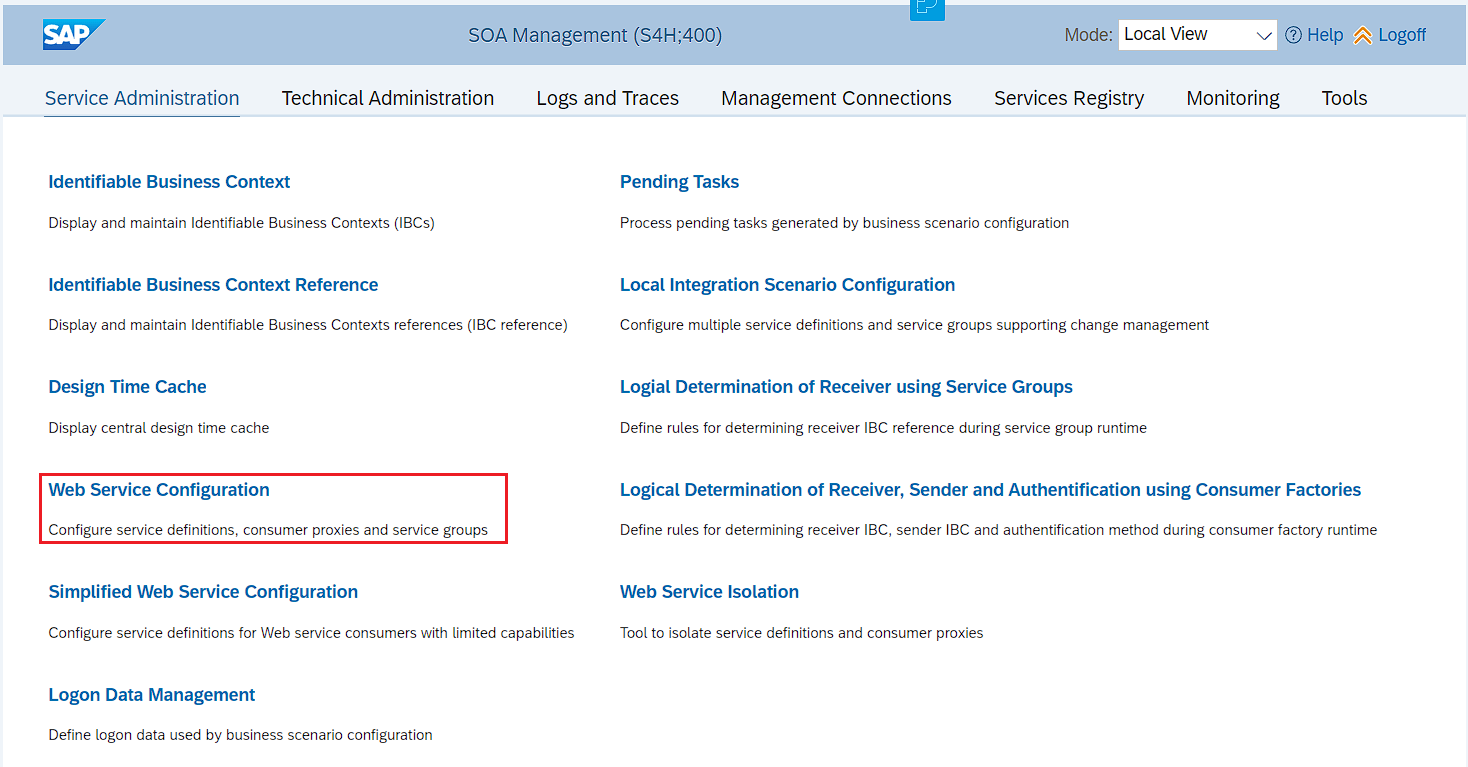
选择图中选中的Web Service configuration。
2.查找Web Service
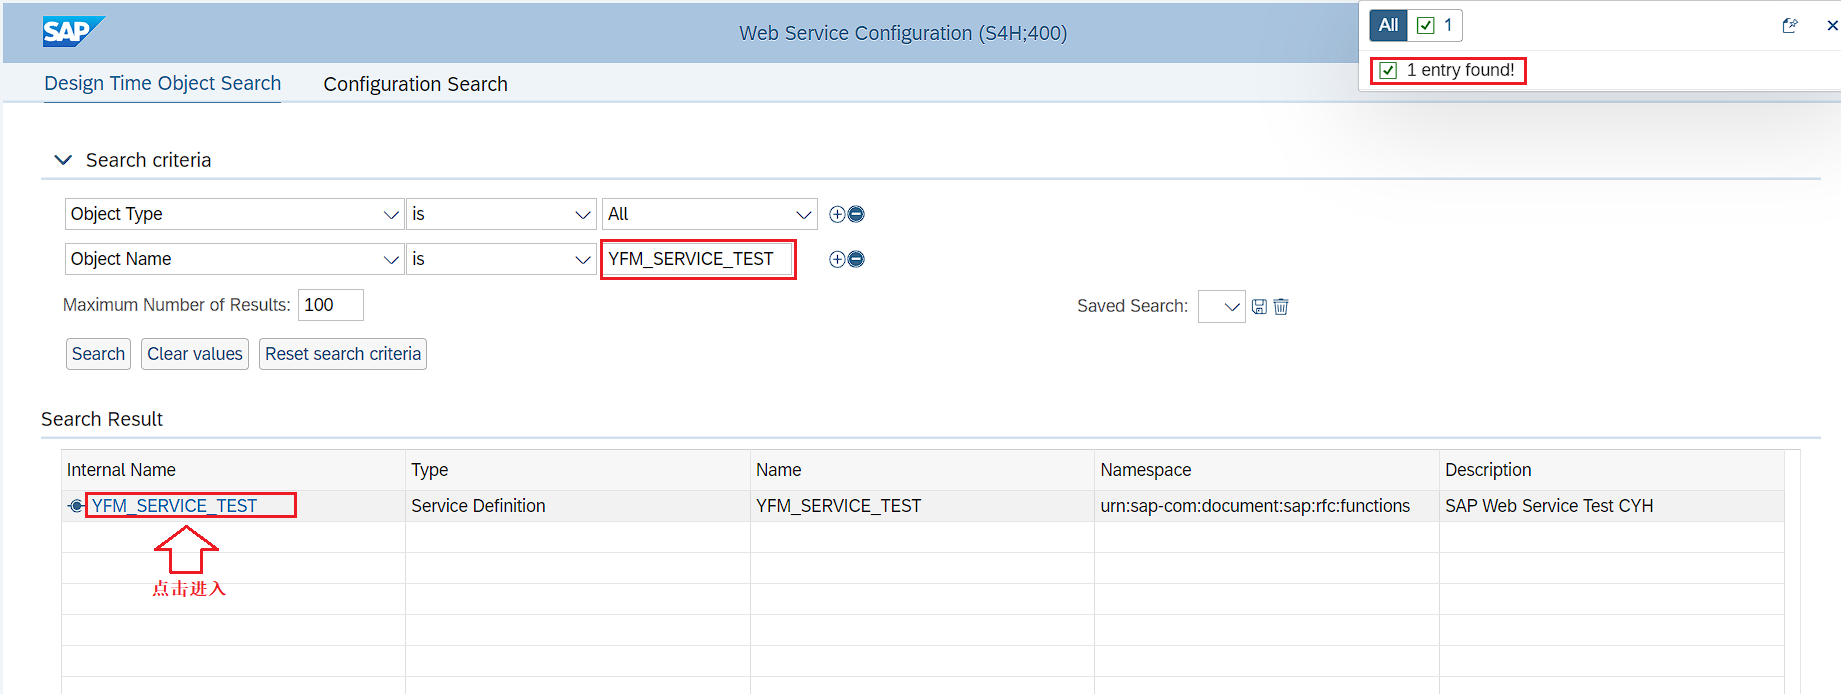
在Object Name搜索栏搜索Web Service的名称,可以使用模糊查询的方式。查询到的结果会展示在下方,在下方选择需要发布的Web Service然后单击进入创建发布界面。
3.发布管理界面
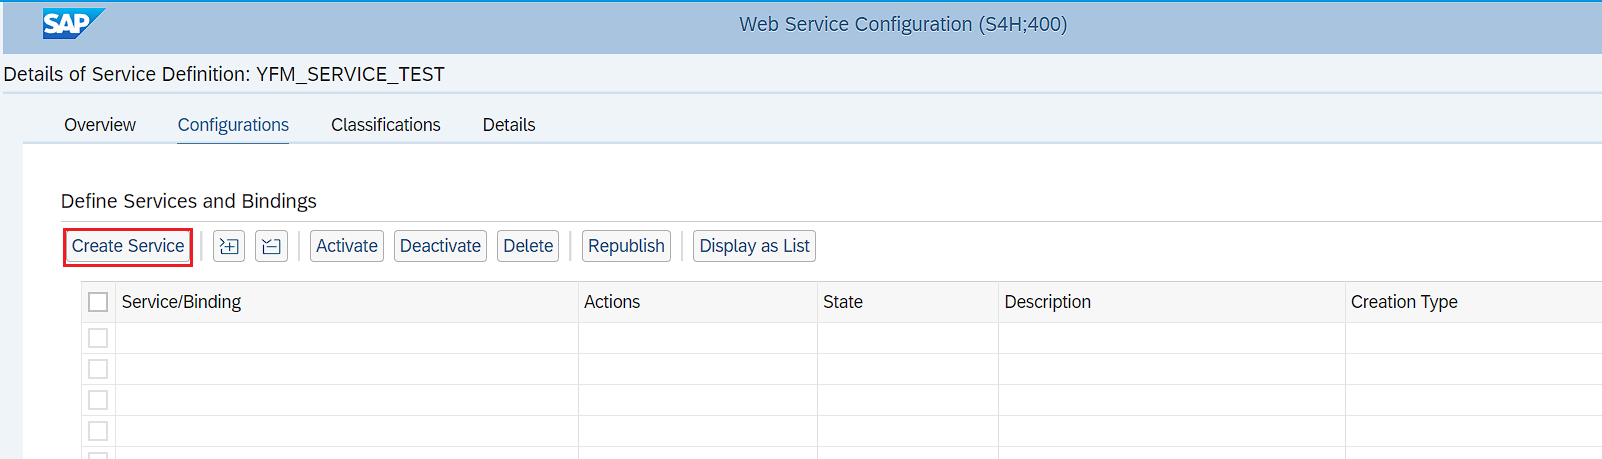
如果后续还涉及变更等操作时,也同样是在这个界面进行操作。
4.创建Service
(1)服务与绑定名称
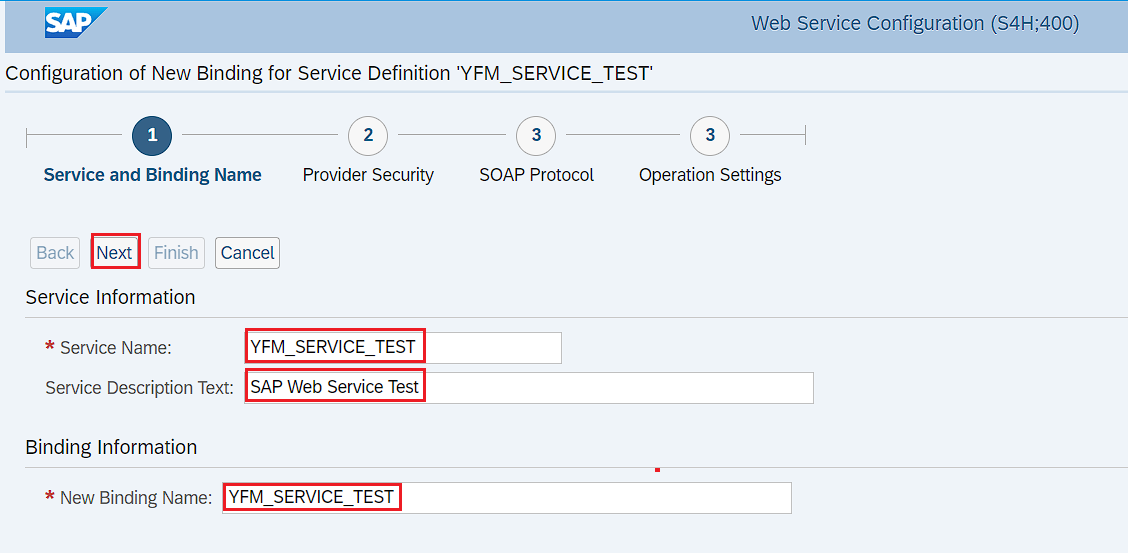
输入完服务与绑定名称之后点击上方的next按钮进行下一步。
(2)设置访问安全性
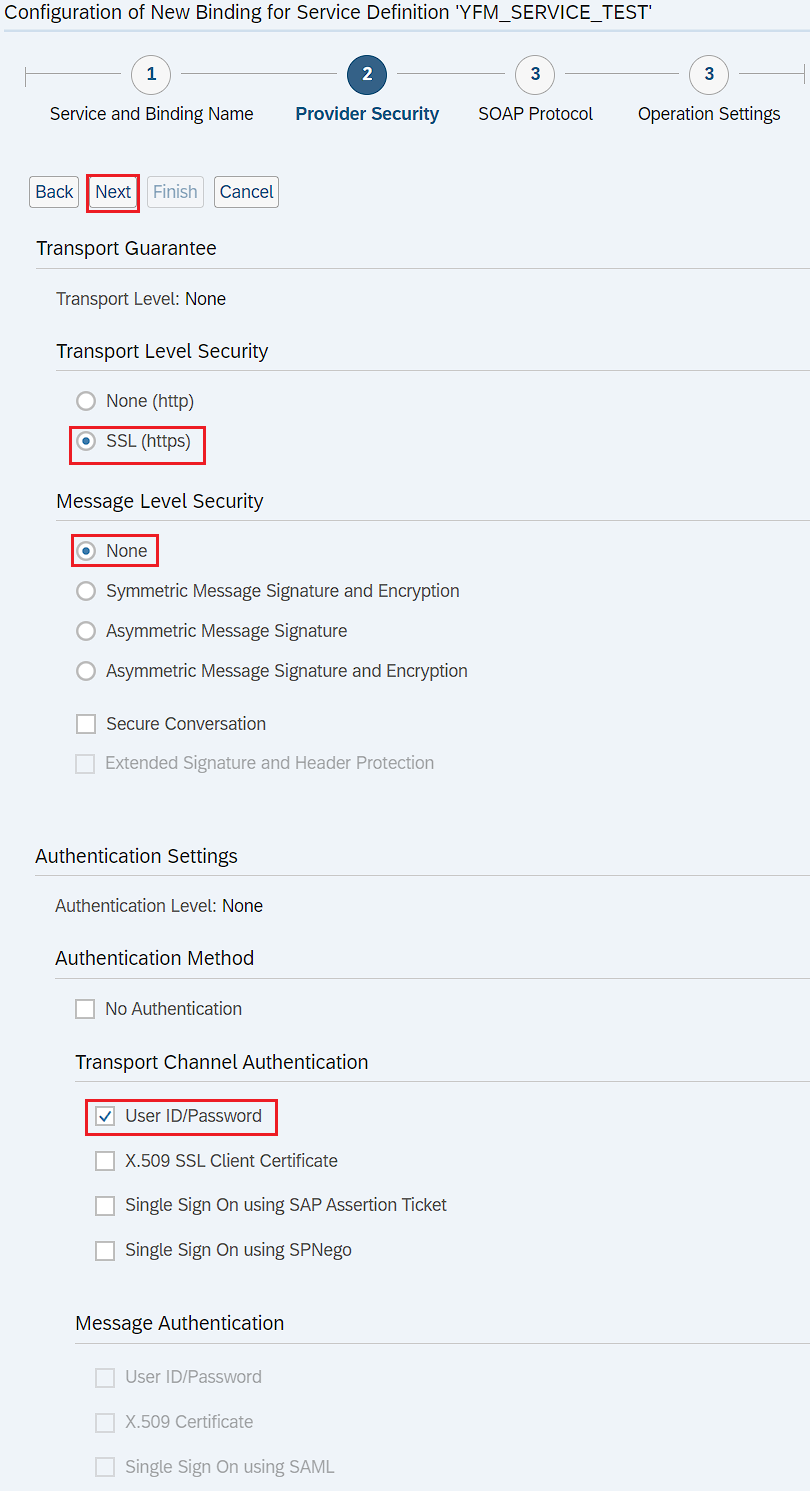
根据上所选择的方式进行设置,本次勾选的下方User ID/Password是通过用户账号密码的形式访问的。如果在上面创建Web Service的配置服务时选择不同的内容,此处部分内容或许会变成不可编辑状态。
设置完成后点击Next按钮进入下一步。
(3)完成发布内容
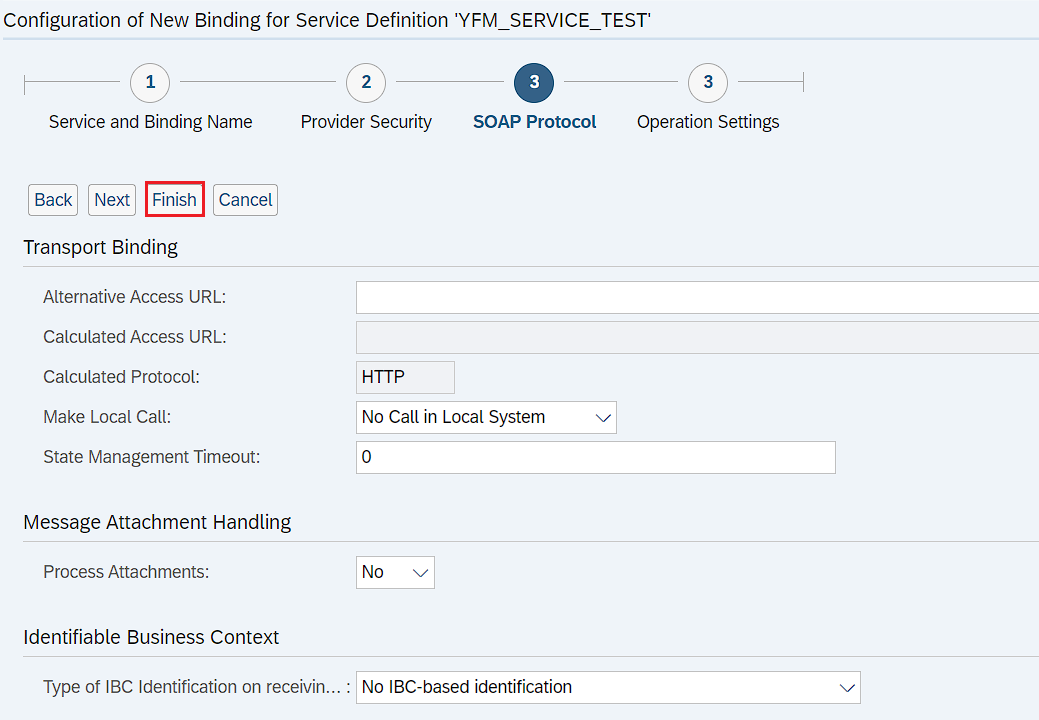
点击上方的Finish按钮完成Web Service的发布工作。
5.完成发布
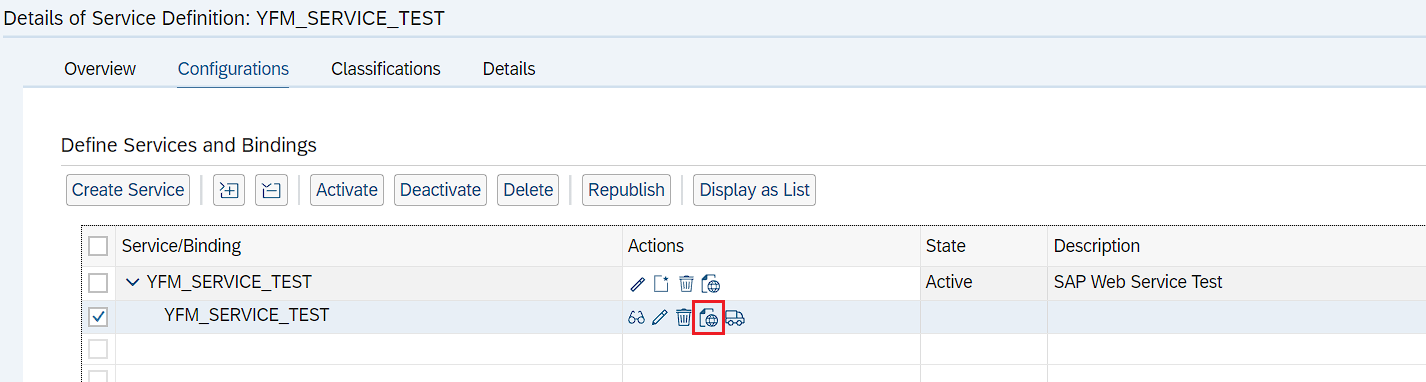
在上图点击图示按钮查看Service的属性。
6.WSDL URL
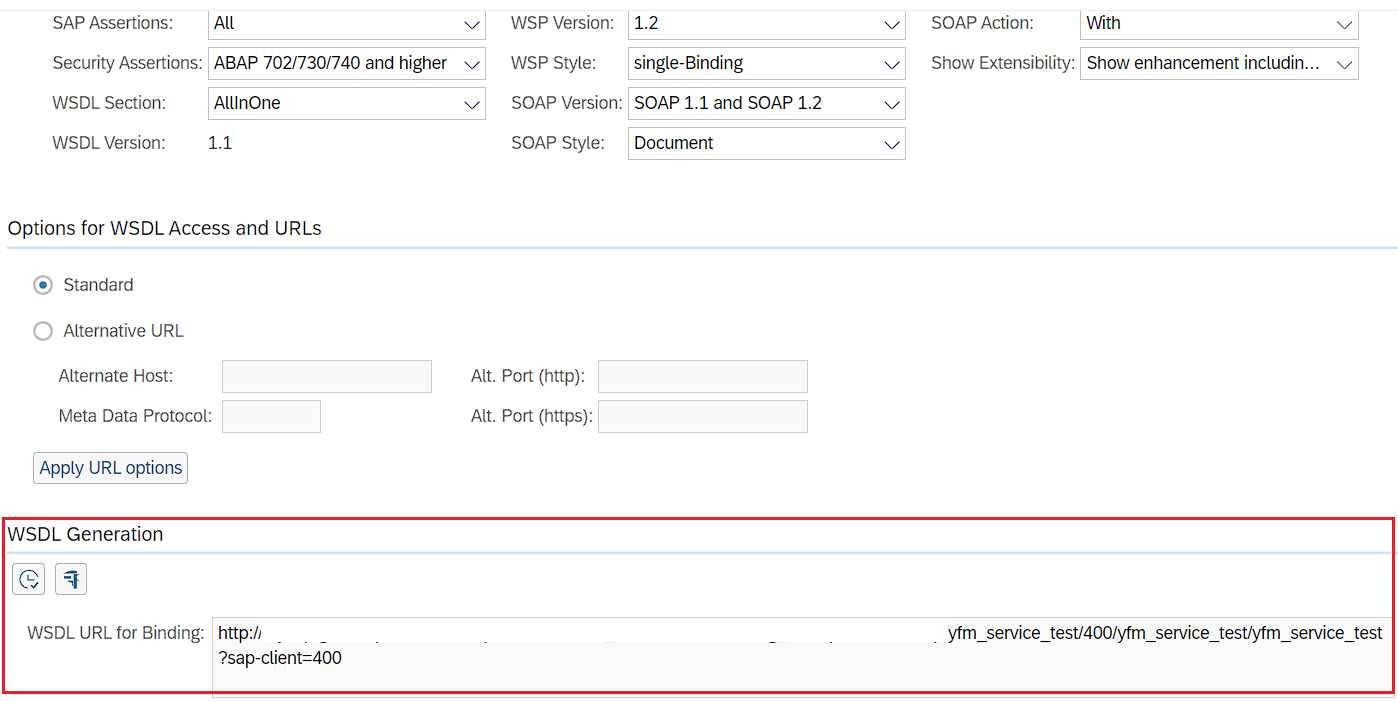
记录好下方的WSDL URL将其提供给外部调用SAP系统的开发人员或系统。外部系统就可以通过WSDL URL对SAP系统进行访问。
五、Web Service的测试
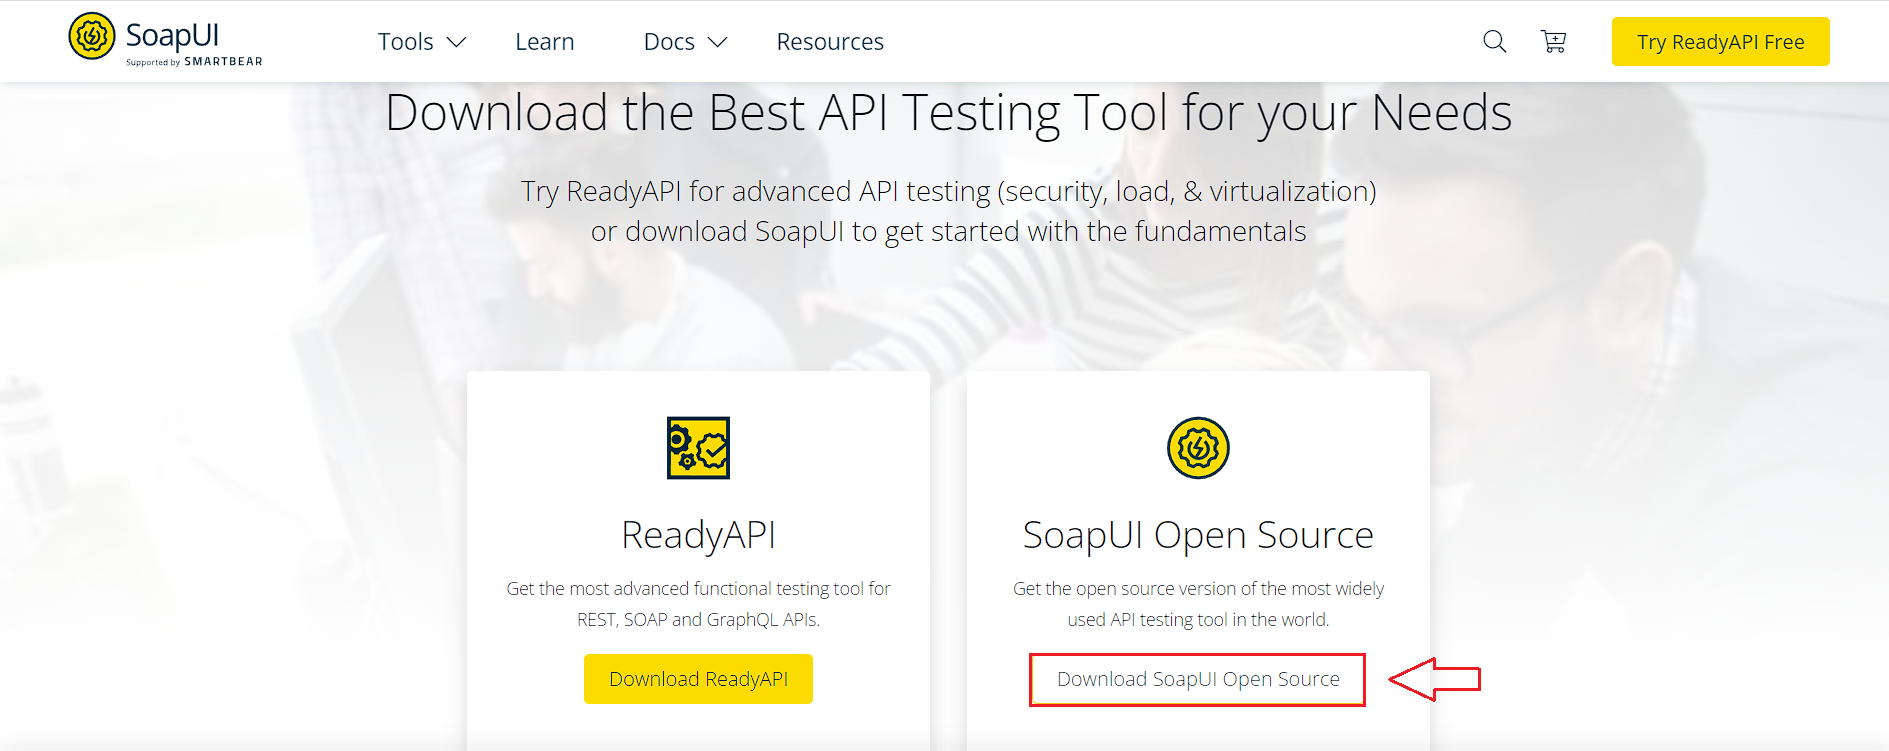
1.测试软件的安装
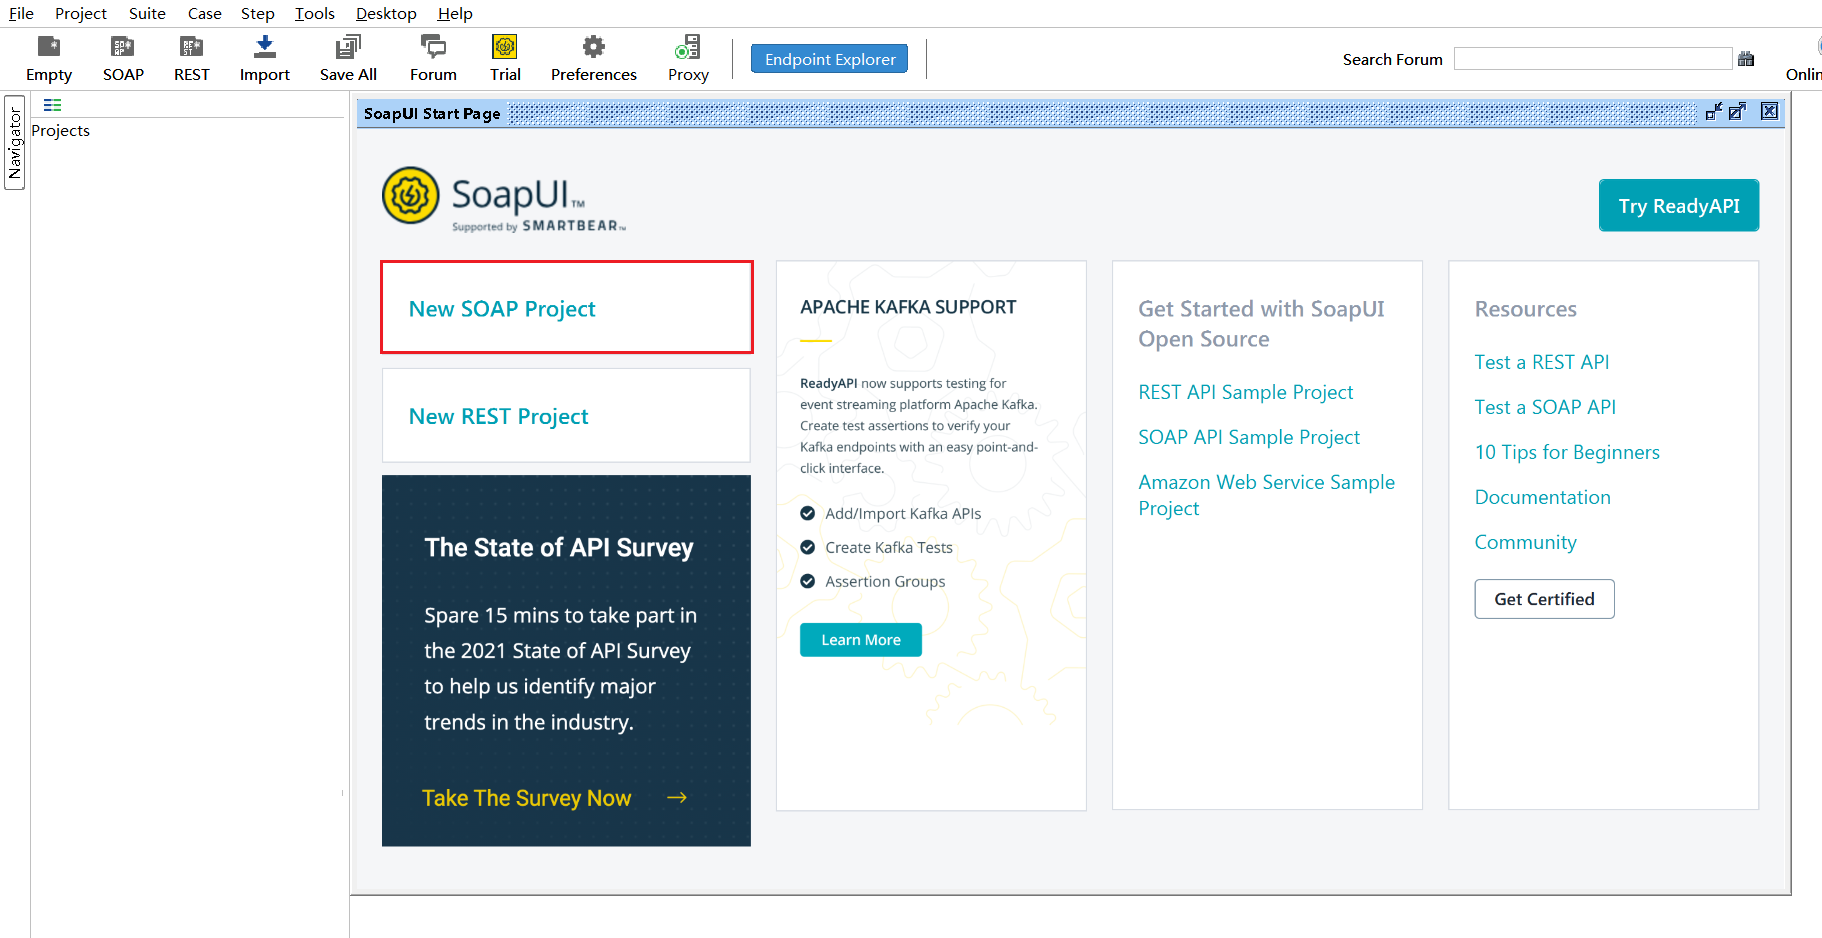
本次测试Web Service主要使用的是SoapUI。下载链接:https://www.soapui.org/downloads/soapui/
2.打开测试软件填入WSDL URL
新建SOAP 项目。
填入项目名称与上面发布的WSDL URL。
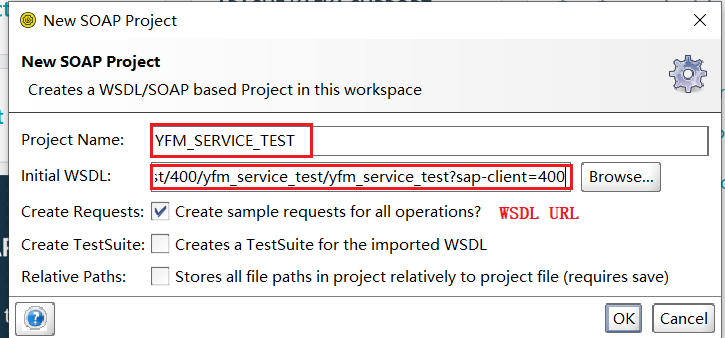
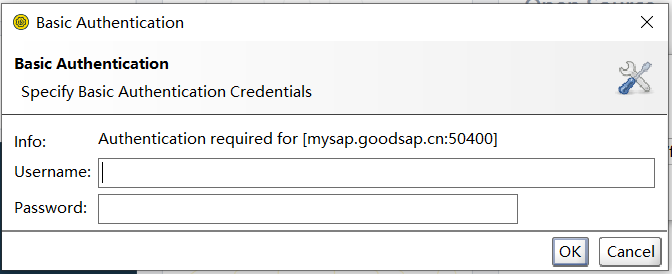
创建时需要填入你的SAP GUI账号与密码。
3.测试项目创建完成界面
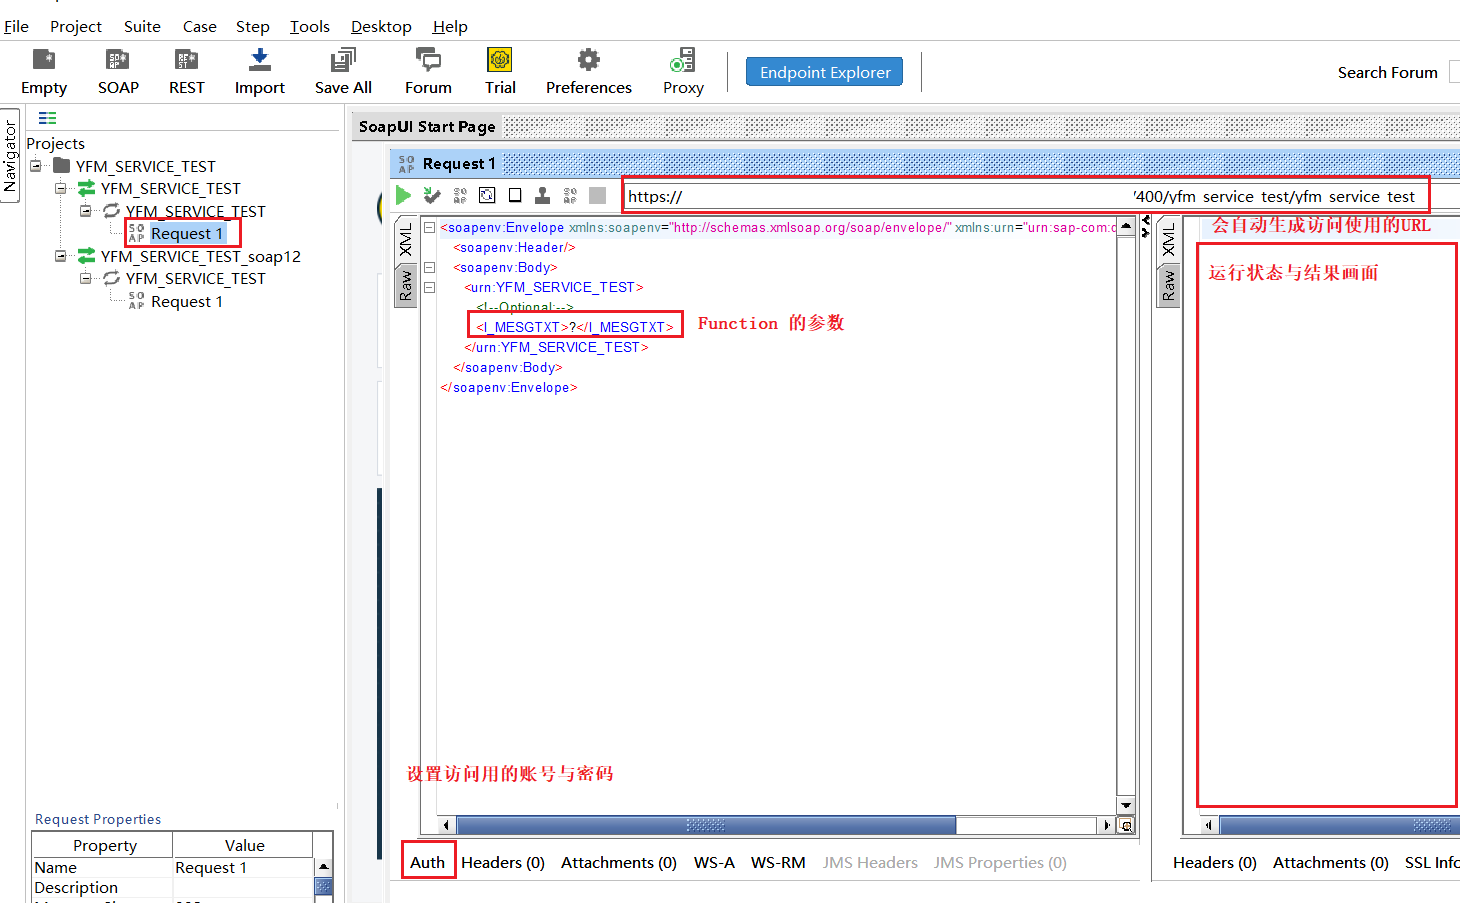
创建完成之后在左侧的列表会将创建好的项目展示出来。按照红框标记的内容在左侧的项目栏中双击Request 1打开XML形式的数据格式。如右侧所示,在左边的空白文本框中可以填写传递的参数。但是因为我们在发布Web Service时选择了通过用户名与密码的验证方式,所以需要在面设置访问用的账号密码。但是密码基本也和你的SAP GUI账号一致。
4.设置访问账号与密码
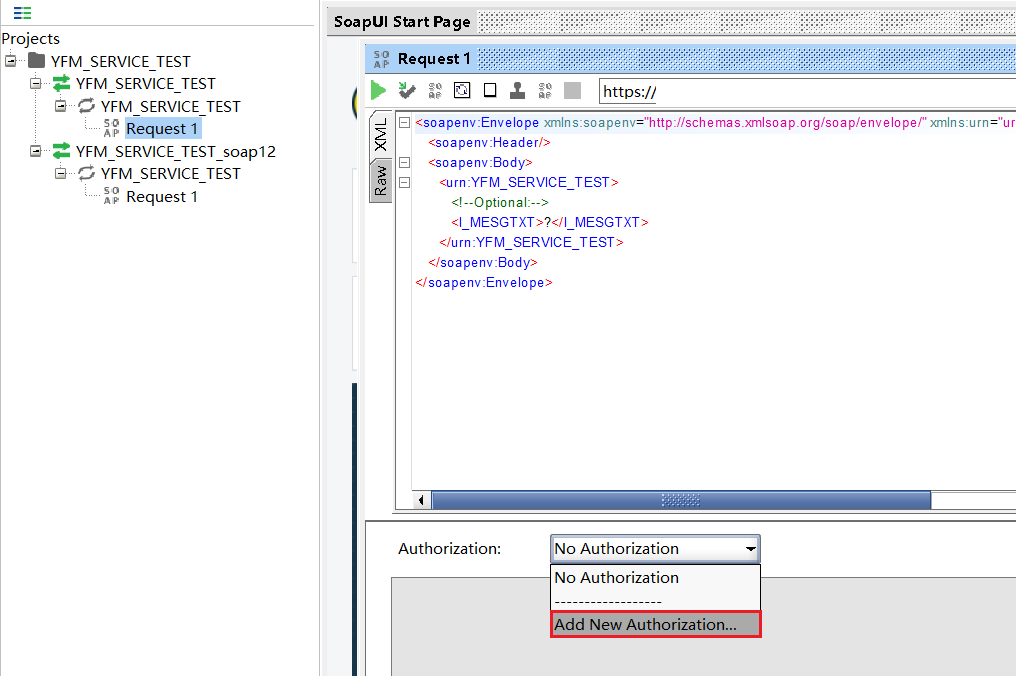
选择权限类型
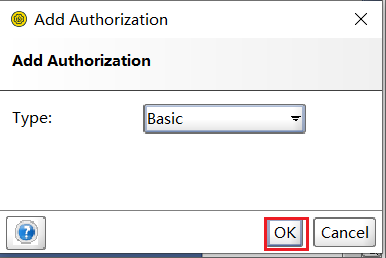
设置权限账号

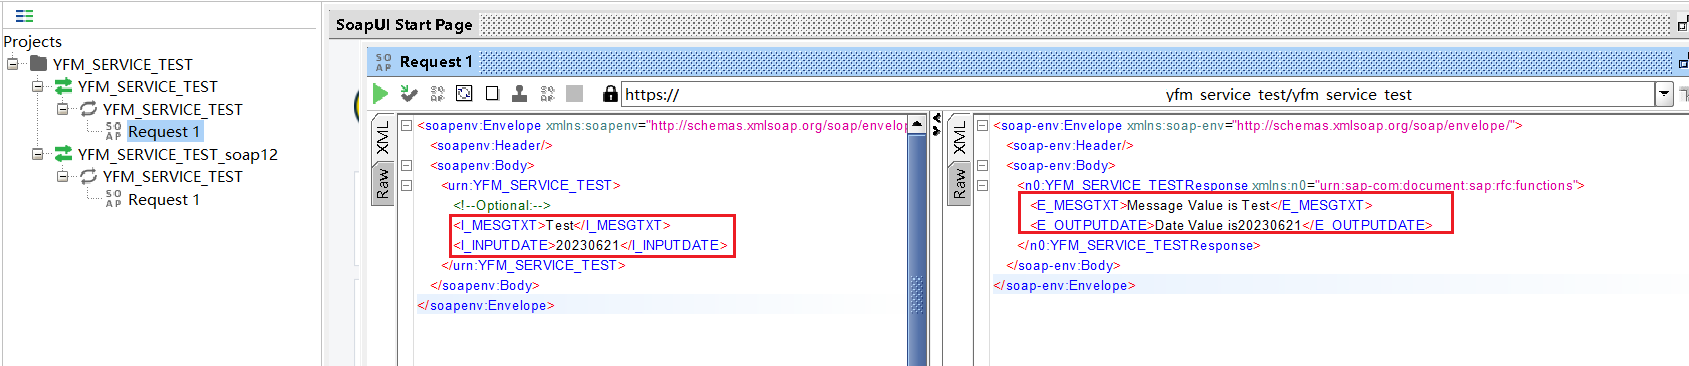
5.测试空值与有值两种情况
(1)空值测试
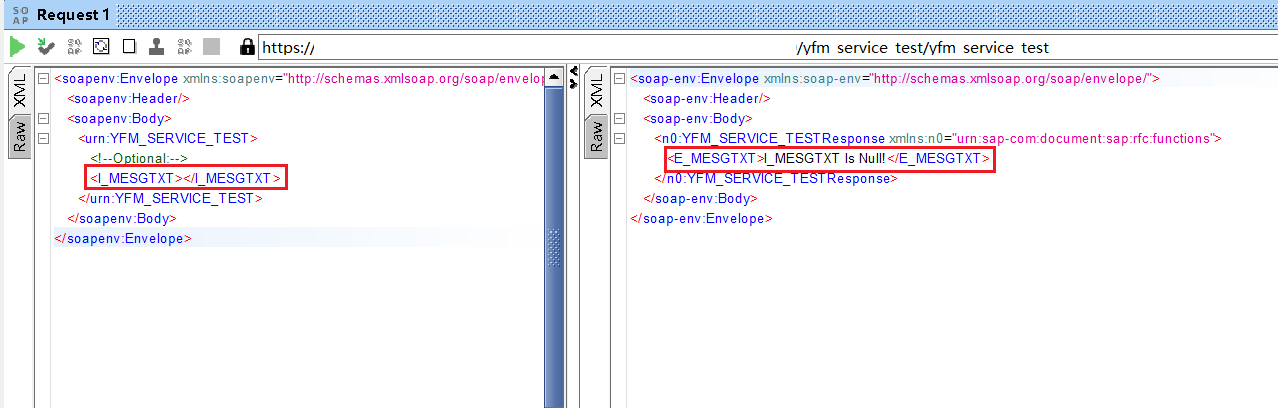
返回内容与Function的设置值一致。

(3)有值测试
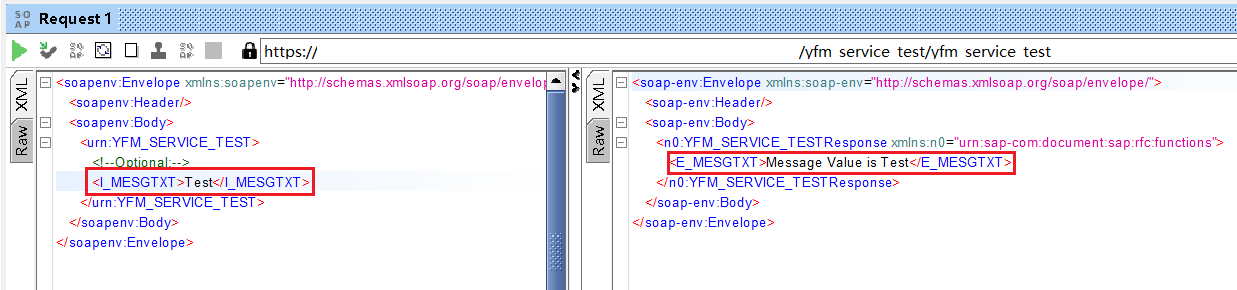
运行状态信息如下
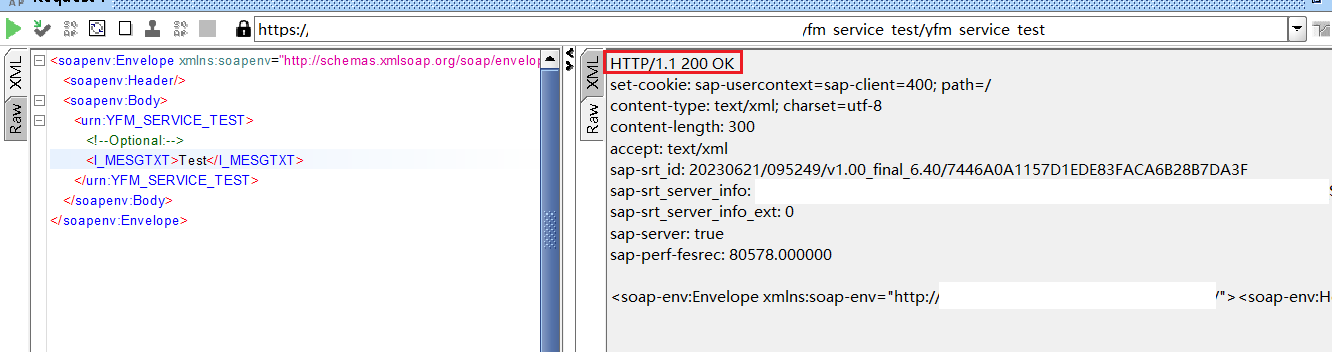
测试结果正确,Web Service创建与发布成功
六、接口一致性检查
当已经发布的接口修改或者增加栏位和结构时,需要重新进行一致性检查,否则WSDL URL地址不会更新。
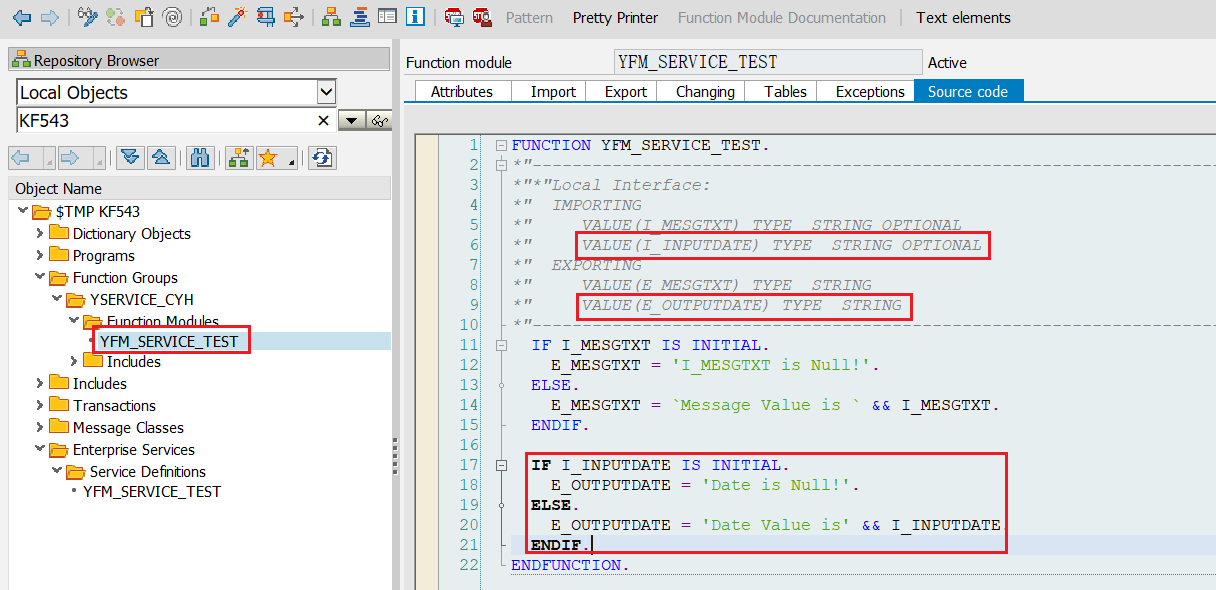
1.Function 新增两个参数
新增一个输入参数和一个输出参数,在Source Code中添加相应的代码逻辑。然后激活Function。
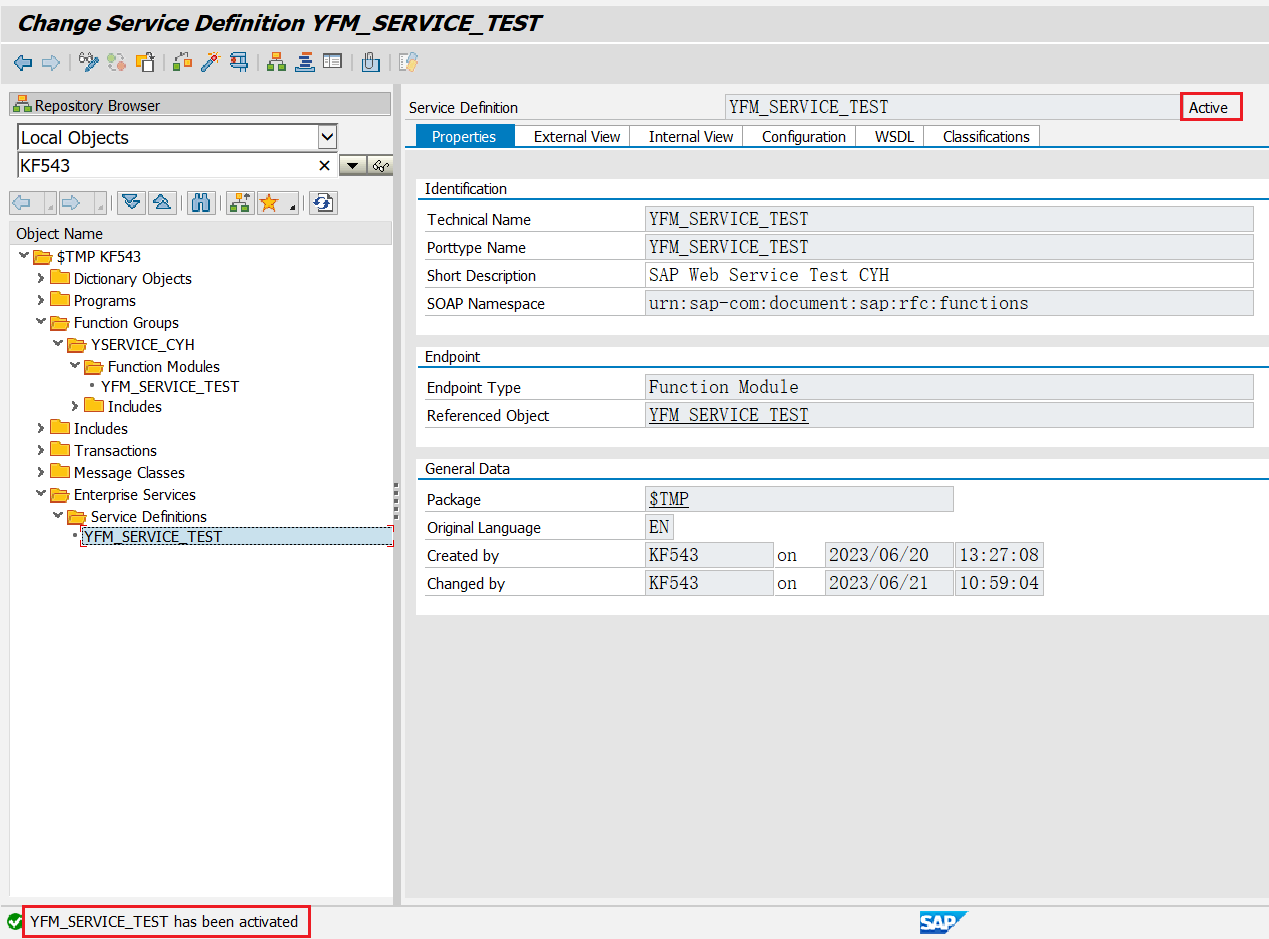
2.打开依照该Function Module创建的Web Service
使用TCODE SE80,找到Web Service。在Web Service处右键—>一致性检查(Consistency Check)—>激活。
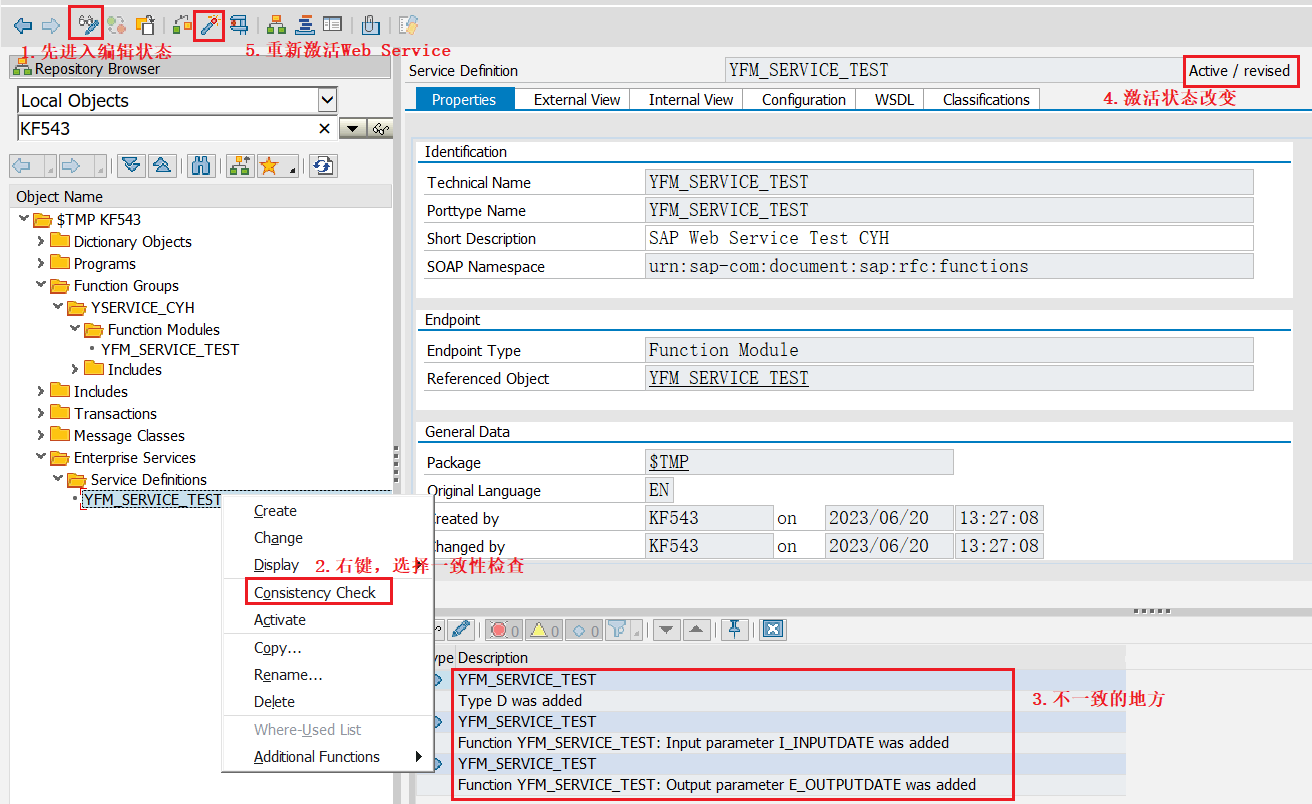
激活成功后的状态
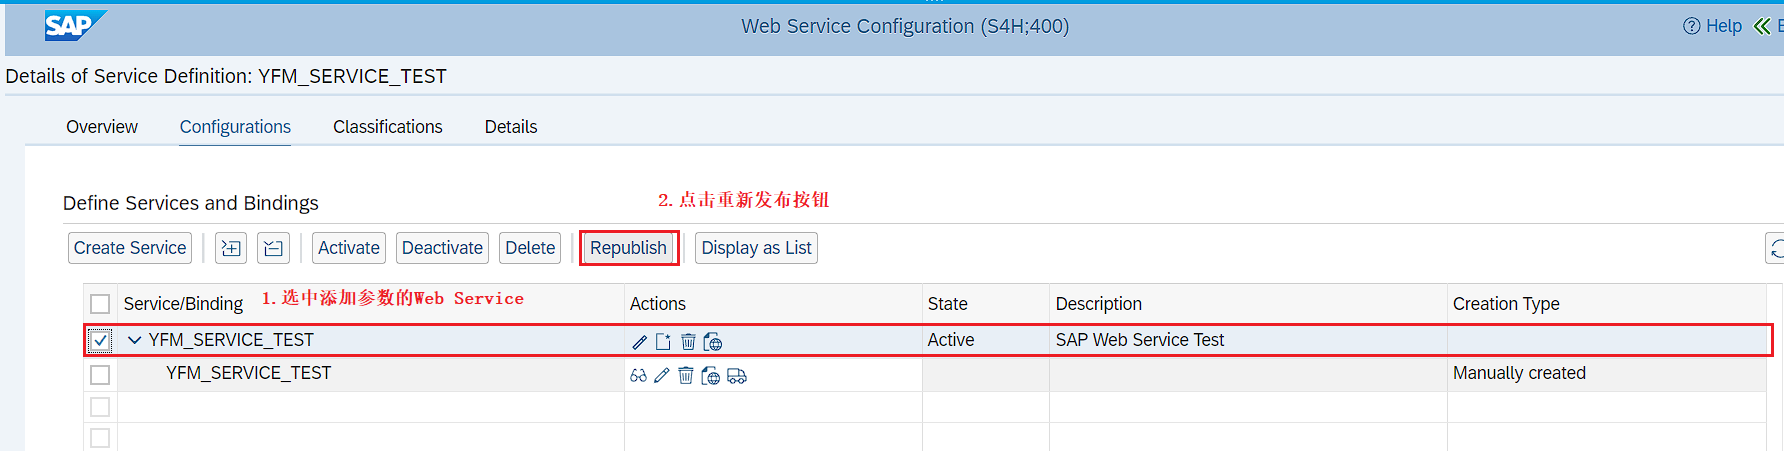
3.重新发布Web Service
和正常发布Web Service的步骤类似,也是先使用TCODE SOAMANAGER。然后一直进入到下面的发布管理界面。
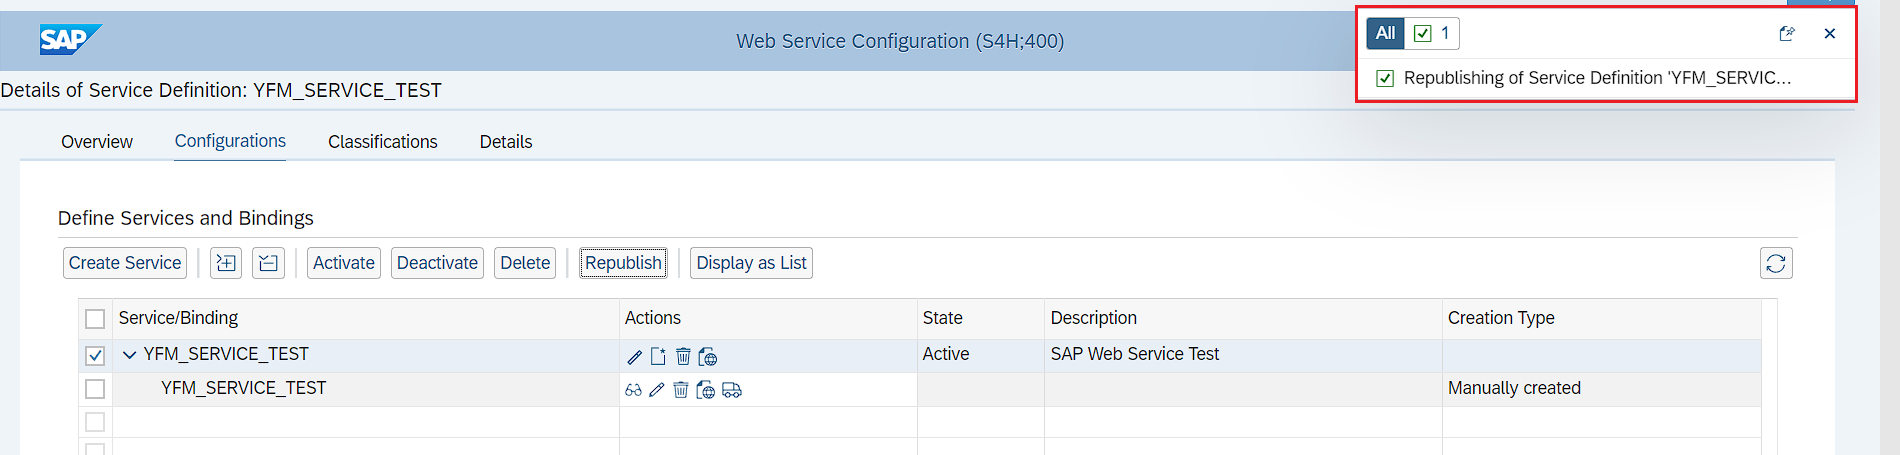
这样就发布成功了,然后对重新发布前后的WSDL URL进行比较。重新发布一般不会变更WSDL URL,但是还是对照下的好。本次我的参数变更并没有修改WSDL URL。

重新使用SOAP UI进行测试,发现修改成功。